
How Nuvola Tools work
First of all let's say Nuvola Tools work different from anything else you may have seen.
All other denoising / despeckle plugins perform mathematical 2D operations treating the work area as a whole they may clip levels, ok, but what they do is applying very sophisticated 2D filters and transforms, maybe even adaptive ones. While this works beautifully for camera pictures (Topaz is one awesome example), the results are less than ideal for high resolution grayscale scans of printed matter.
Nuvola Tools completely rejects this procedure and uses advanced computer vision techniques to actually recognize the elements your pictures is made of, then processes them differently as requested.
That's why installing Nuvola Tools (NT for short) requires the presence of external computer vision libraries and for now it's developed under linux / ubuntu.
So, what's NT really doing? Basically it preprocesses the picture tho enhance the contrast as specified, performs a topological analisys and subsequently adds one or more layers where the output results are superimposed to your original picture. The output results basically consist of "patches" which remove or modify the picture by actually covering undesirable recognized elements like dust particles and such.
You may then disable (or delete) such layers and instantly see the difference for yourself without mangling the original picture or layer you were processing. If you like the result, just right-click over the resulting layer(s) and do a "Merge Down" to incorporate the results in your original work.
We can do all of this because we make some fundamental assumptions regarding our picture: since we aren't operating with "continuous" subjects like those encountered in camera pictures, we may safely assume that our pictures consists of definite elements like dots, lines and complex shapes plus a certain amount of noise.
Moreover, it's acceptable and actually desired an output which results in very high contrast images, where the blacks are truly black and the whites are completely white or at least shades of continuous gray since the resulting output looks beautiful and pleasant to the human eye.
So our freedom operate is greatly enhanced and we can then do things which would otherwise be impossible or at least very difficult to obtain with camera pictures!
The idea is of course to save time by letting the tools do what you were previously and painfully slowly doing by hand.
It also goes without saying that the best results are obtained with large high resolution pictures where dust, shadows and other artifacts truly become eyesores!
The interface(s)
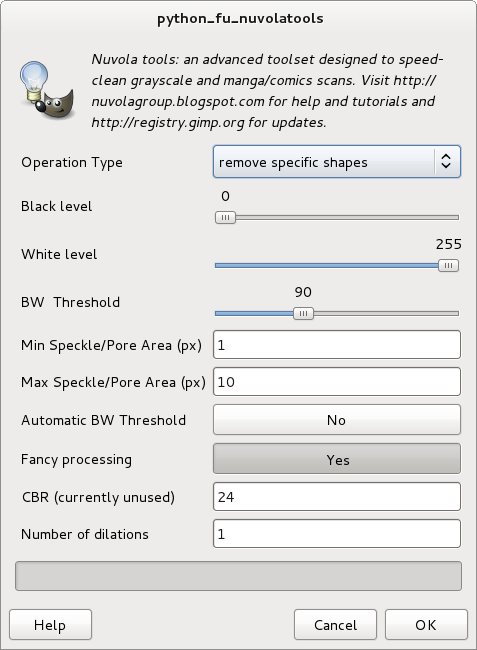
As you may see the interface is pretty intuitive, oh by the way: you access it via Filters -> Artistic -> Nuvola Tools, the first line selects the operation type.
This determines the meaning of the following lines.
The first operation is "speckles", used to remove the dust, the black component of noise and black shadows due to white paper transparency.
The second one is "whitepores": come handy when the blacks, either lineart or black scenes aren't solid black but rather a black or gray "sponge" with many tiny white holes. This effect is usually visible when the print is less than perfect or on poor quality paper.
The effect of whitepores is to actually fill the white holes with black patches a bit larger than the holes, so that the finall effect is a full solid black. In order to do that the patches rims are "dilated": a layer of black pixels 1 pixel thick is added to the border. The last parameter, "number of dilations" determines actually this and is always applied last. The first three operation type use this parameter. It is usually preset to one.
Then the last operation, "remove specific shapes", performs an operation similar to speckles but calls for a secondary menu where you may specify many more options related to shapes and position of the objects you want to remove.
Let's now look at what the other parameters do. Black level and white level are taken from the Color -> Levels operation and are used to clip the higher white and lower black levels. The effect is to make whites whiter (values < 255) and black blacker (values > 0). It is applied first to the picture in order to preprocess it and increase contrast.
The defaults are 0 and 255 which mean "do nothing".
The BW threshold slider lets you select any gray value out of the available 256. Anything lower is effectively interpreted as a solid "black", anything higher turns to white. Most operation are done after the picture is internally converted to black/white (1 bit color), the default value is conveniently preset to 90, a reasonable level that keeps lineart black and most background white.
Careful with this slider: if you operate on whitepores the picture internally gets its values inverted, so 255 stands for black and 0 stands for white!
When properly set, however, the results are impressive.
Min and Max Pore/Speckle Area are practically self-explanatory. Let's just says those are values you need to find once. Experiment by applying NT (short for Nuvola Tools) to a small square selection and see what happens. For a starter I suggest leaving the minimum value preset to 1 if you want to remove dust and tweak the maximum value to remove everything smaller than the smallest screentone dot.
If you want to remove screentones from a selected area better results could be obtained by also setting the minimum value a bit smaller than the smallest screentone dot and the maximum value of course a bit larger than the largest screentone dot.
Automatic BW threshold when active ignores the BW threshold slider and autimatically sets a balanced B/W threshold level. This is for lazy people: of course tweaking the slider gives best results.
Fancy Processing is something that should always be set to yes. Although more computationally expensive, it tells Nuvola Tools to perform a series of advanced operations, most of them needed for all but the most basic cases. The primary effect of setting this switch is the appearance of and additional layer beneath the output one. This layer contains the preprocessed image: you may discard it, merge it with the output and use it as an intermediate for further processing.
Inside NT many other additional operations are done to ensure you get a fine output result.
CBR is a special bitwise registry, the first three least significant bits are already assigned, most are useful for serializing operations with the awesome bimp plugin.
##### CBR assigned bit values: 1-clear the work layer // 2-save the resulting image as XCF // 4-for mangaoptype == 2 use the preset extra parameters without asking // 8-delete current session files in shared memory, useful for parallel usage // 16-parallel usage flag, saves files with an (almost) unique name
If you want to combine them, type their sum.
If unsure, don't touch this value, if you don't need debugging and want to enable parallel usage on a multi-core machine use 16.
Number of Dilations basically tells NT to recursively apply dilate to the output for a certain number of times, the idea is that expanding the output efficiently covers dust without leaving below-threshold pixels behind. The final result is thus much pleasant to the eye.
The value is conveniently set to 1, you may set it to anything you want but probably going past 3 is meaningless.
Tutorial: cleaning a high resolution sample
<<CONTINUES>>


No comments:
Post a Comment